Precision shooting demands more than pulling a trigger—it begins with understanding every mechanical and optical element involved. Among them, scope adjustment plays a central role. Yet, too often, shooters rush to dial turrets without securing the essentials. This guide offers a structured, methodical approach to adjusting your rifle scope—step by step—to ensure accuracy, repeatability, and confidence in every shot.
Accurate shooting does not start with turret adjustments—it begins with a solid mechanical foundation. Scope mounting is often underestimated, but if improperly executed, no amount of turret dialing can compensate. Misalignment, loose fasteners, or poor fit in the mounting system introduces persistent inaccuracies that cannot be resolved downrange.
Before touching your adjustment dials, ensure the scope is mounted level,
correctly torqued, and aligned with the rifle's bore axis. This process must be
approached as a critical prerequisite, not an optional step.
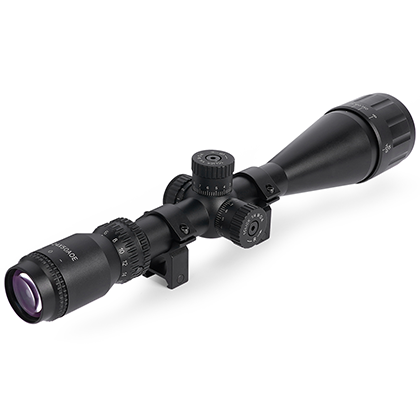
A rifle scope generally consists of an objective lens at the front, an ocular
lens at the rear, a main tube, and turrets placed centrally for windage and
elevation. Variable magnification models add a zoom ring, and more advanced
options may feature side parallax adjustment, zero-stop turrets, illumination
controls, or locking mechanisms.
Knowing how your scope operates helps prevent avoidable mistakes. For
example, adjusting windage will not resolve a canted reticle or a misaligned
mount. Understanding the internal mechanisms, such as the erector tube or turret
springs, allows for more confident and deliberate changes.
Your scope mount must be considered an extension of the firearm itself.
One-piece mounts are preferred for AR-style rifles due to their inherent
rigidity, while bolt-action rifles often require two-piece ring systems. Both
configurations can be effective if chosen and installed properly.
Ensure the ring diameter precisely matches the scope tube—commonly 1", 30mm,
or 34mm. Incorrect sizing leads to slippage or tube damage. Material quality
also matters: select steel or premium-grade aluminum components from trusted
brands. Always follow the scope manufacturer's torque guidelines to prevent
over-compression or loosening under recoil.
Mount height influences not only comfort but also shooting precision. The goal is a full, natural sight picture without needing to crane your neck or adjust your posture. If the reticle is centered when you shoulder the rifle with eyes closed, the height is correct.
Additionally, improper scope height can limit your internal adjustment range, especially when using canted mounts or shooting long distances. Balance ergonomic positioning with optical performance.

A torque wrench, leveling devices, and a secure rest are essential. Torque
values must be applied evenly and verified after installation and test firing.
Over-tightening risks thread damage, while under-tightening allows shift under
recoil.
An uneven reticle causes cant error—where elevation adjustments
unintentionally influence windage. Use a plumb line or reticle-leveling tool to
ensure proper alignment. This is one of the most overlooked steps in scope
installation and a major cause of missed shots.
Slide the scope forward or back to achieve a clear field of view with no edge
distortion while maintaining a comfortable shooting posture. Incorrect eye
relief can cause injury or hinder consistency. Once established, secure the
scope evenly, alternating screw tension to maintain even pressure. Re-check eye
relief afterward to ensure it hasn't shifted.
Start with a mechanically centered reticle by dialing each turret to its maximum and then returning halfway. This ensures you're operating within the full usable range of your adjustments and prevents pre-loading correction into a misaligned setup.
Centering also provides a diagnostic baseline. If problems arise later,
knowing your turrets began from a neutral point simplifies troubleshooting.
Bore sighting helps get your first shots "on paper." If your firearm allows
bolt removal, align the bore with a distant target and adjust the reticle
accordingly. A laser bore sighter can achieve similar results. This is not the
same as zeroing but is an efficient way to reduce wasted ammunition.
Start at 25 or 50 yards. Fire a tight three-shot group and measure the group
center's deviation from the bullseye. Make turret corrections based on group
center—not individual shots. Repeat until centered before moving to a longer
range.
Scopes typically adjust in ¼ MOA or 0.1 mil increments. Know your scope's
click value and the distance to your target. Misinterpreting these increments
leads to inefficient or excessive adjustments.
After zeroing at a short range, move to 100 yards or your intended zero distance. Fire groups and confirm results before making corrections. If group size increases or zero shifts, recheck mounting torque and scope alignment.

After achieving zero, verify stability. If your scope includes turret locks, engage them. Mark turrets with a fine-tip paint pen if necessary. Ensure the rifle is stored securely in padded cases, avoiding pressure on turrets during transport.
Post-range checks are critical: verify all fasteners are still torqued,
especially after initial rounds. Retighten as needed using a torque wrench. A
secure setup resists recoil-induced drift.
Even a 5 mph crosswind at 100 yards can significantly alter bullet impact, depending on your caliber. You can compensate by holding off or dialing windage. Dialing provides precision, but only if your scope tracks correctly and your mount is stable.
Learn to read wind through environmental cues like mirage, grass movement, or
flags.
Beyond 100 yards, gravity becomes a more prominent factor. Use ballistic charts or verified range data to dial in elevation. Confirm adjustments through live fire—calculators are helpful, but practical confirmation is irreplaceable.

Parallax error occurs when the target and reticle appear on different focal planes, causing the reticle to shift as your eye moves. This is especially relevant beyond 100 yards. Use the side focus or objective lens ring to remove this error. When properly set, the reticle should remain motionless as your eye shifts position.
Overlooking parallax adjustment results in missed shots even when everything
else seems perfect.
Examine scope rings, turret caps, reticle alignment, and overall optic
condition. Look for signs of shifting or mechanical stress. Log your groupings,
weather conditions, and torque specs. This builds a performance baseline and
reveals issues early.
Treat your scope as a precision optical device. Use lens-safe tools—no tissues or rough fabric. Keep turrets clean and moisture-free. Store the rifle in a padded case with lens caps installed.
Even seemingly minor bumps in storage can disturb internal scope alignment.
Protective care preserves your zero and investment.
Several scenarios demand zero verification:
Changing bullet brand or lot
Crossing major elevation zones
Extreme temperature changes
Post-flight or rough transport
Re-mounting or adjusting the scope
Ballistics are sensitive to environmental and mechanical variables.
Re-checking zero is standard procedure, not paranoia. It ensures your equipment
performs predictably when it matters most.
Adjusting a rifle scope isn't just about making a few turret clicks—it's a layered process that starts with the right mount, flows through mechanical centering, and demands discipline in everything from parallax control to zero confirmation. Each of these steps reinforces the next, and shortcuts at any point can compromise your final results. That's why the quality of your equipment matters as much as the method behind it. For shooters who expect their optics to respond precisely to each calibrated move, Aetronix delivers platforms that support this level of exactness—where every click, every lock, and every hold point behaves exactly as it should.
For inquiries, please visit https://www.axoptics.com/ or email us at cc1535@gmail.com_